Writing is not a favorite subject for most school kids, but rainbow writing could be a winner! Because writing involves small motor skills (hands and fingers) and sitting at a desk for long periods of time, kids usually struggle when learning to write.
So why not use a motivating activity like rainbow writing to liven a classroom?
I know the challenges kids face from my experience as a teacher. When we ask children to write their name repetitively or write numerals or spelling words again and again, we are asking them to do a very boring activity.
Unless of course, we call it rainbow writing! Then the writing activity suddenly becomes art and a fun activity with the addition of color!
What Is Rainbow Writing
Rainbow writing is a fun activity for young students and for kids at home who need to practice their writing. It involves words and colors. It can integrate writing with other learning opportunities such as the colors of the rainbow.
It can be used for small children learning letter and number writing for the first time, or for older students who need to develop their cursive writing style. Rainbow writing occurs when participants trace around the outside or the inside of letters or numbers.
Letters and numbers become layered with colors!
Best Ages and Grade For A Classroom Rainbow Writing Activity
In my classrooms, I remember the painful lessons that involved lined paper, dotted images with arrows to follow, and pencils gripped so tightly they might break in half.
Broken pencil lead was usually followed with multiple trips to the pencil sharpener and groans about, “how much longer do we have to do this?”.
To make rainbow writing a successful activity, the grade levels and ages of children need to be taken into account.
For example, a pre-K or Kindergartener would need a lot of space on paper to write. I have seen many teachers fail at this, but let’s take a look at a successful example.
Let’s say Mary is learning to write her alphabet. Child development specialists are quick to point out that the more senses that are involved in the activity, the easier it is to learn.
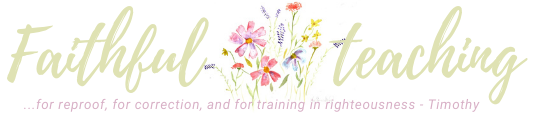
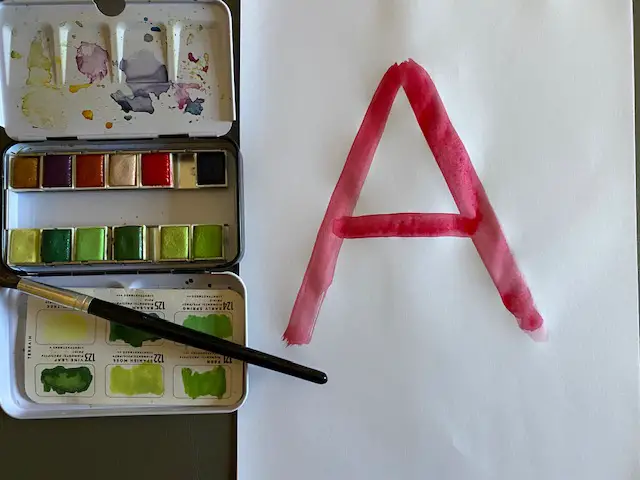
So Mary’s teacher does not give her a piece of paper and a pencil to begin. Instead, Mary begins with a large easel with a giant letter “A” on it. This would be an amazing introduction to writing.
Mary picks up her brush and from 3 pretty color choices begins to trace the letters the teacher has just demonstrated how to write correctly. Mary is using her whole arm, visualizing her color choices, holding a large tool (not a tiny pencil), and probably can move around a bit while standing like a real artist.
In a few minutes, she will have a colorful letter “A”. Important note: Always preselect paint colors. Choose 3 colors that are next to each other on the color wheel, not opposite (remember, opposite colors turn brown when mixed together).
A similar activity can be done on a whiteboard with multiple students practicing at the same time. Their “art” would not be permanent however so that is a consideration.
Usually, the fact that they get to “play” on the whiteboard will counter any disappointment of not having a finished piece of art. This is also a great way for the teacher to see if students are following the correct method of writing a letter.
I have found incorrect letter formation to be a big problem in the later grades when students have written the wrong way for years.
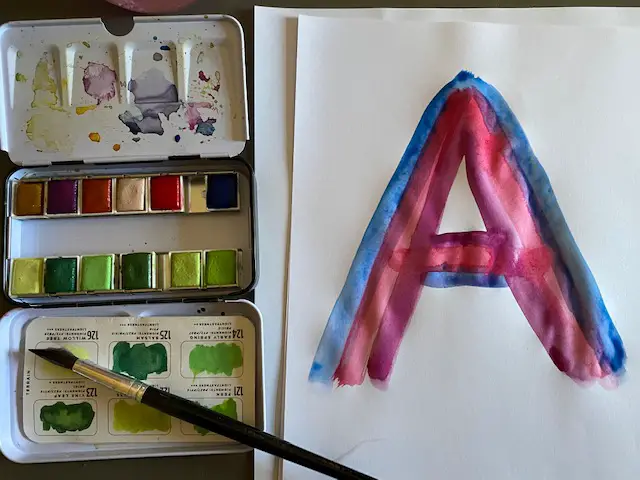
As the student gets older the tools and the space required becomes smaller. By third grade, kids know their letters and numbers but now have spelling words they could “rainbow write”. Small size crayons, felt markers or gel pens would be fun (another fun educational activity is blackout poetry).
I think that the high-end grade for rainbow writing would top out at 3rd grade. Cursive writing normally taught in 2-3rd grade, would be appropriate for multiple colors.
Materials Needed For Rainbow Writing
The materials used for rainbow writing need to match the age and skill level of the student. The fact that those options have improved since I taught is wonderful.
Rainbow writing can be done with colored pencils, ink pens, markers, paintbrushes and paint, felt tip pens, gel pens, and of course crayons. Teachers should choose the appropriate paper.
As children advance through the grades, writing can be practiced on lined paper with less space. This will mean that the tool selected for rainbow writing has to fit on the lines too.
Fat crayons, while appropriate for wide lines don’t work on college ruled paper of course. Certain felt pens are actually against the law in most classrooms so be aware of that. Plus, if the paper is too thin watery pens can seep through.
I think that lined paper is not the best choice for rainbow writing. It’s easy to make copies of the letter being practiced on blank paper.
Purpose of the activity
The purpose of rainbow writing is practice, practice, practice. Practice letter and number formation, practice cursive writing techniques, or practice spelling words (if you’re preparing sub plans, this rainbow writing is a good one).
Each type can become boring and frustrating for kids but by adding color, it becomes less-so.
Normally rainbow writing would just be for individual students, but it’s possible to have fun in a group by passing the letters around and each person drawing one line. For example, in a group of four students, each student starts with a paper.
>>read my other article about free typing games for kids
They can choose one of the forms to begin then everyone passes their paper to the next person. Each time making just one mark and passing it on.
The challenge might be to not repeat colors or draw two of the same next to each other. Completing the activity would involve selecting the “best of” and sharing with the rest of the class.
I suppose that rainbow writing could be an art activity especially if the children are taught and then expected to place the colors in the true order – ROYGBIV – red, orange, yellow, green, blue indigo and violet.
Analogous and complementary colors could be taught and then used. Analogous colors being next to each other on the color wheel or complementary colors on the opposite.
As with any teaching it is always a good idea to teach and demonstrate before passing out materials. Set up the activity, monitor and correct as you go. Rainbow writing should not be graded. It is really just practice.
Required Colors For Rainbow Writing
Most kids learn the colors of the rainbow early on by remembering the man’s name Roy G. Biv. This name is a catchy way for kids to remember all the colors by listing the first letter of the colors needed for the rainbow (red, orange, yellow, green, blue, indigo, violet).
Depending on the lesson the colors can be assigned or not. Most teachers with experience doing this recommend limiting the number of colors just so there are enough tools for each child.
No student needs an entire set of colors, just a few to practice rainbow writing. Felt pens will likely make marks on skin and tables and paints will be messy. Teachers should determine the boundaries of this activity clearly and early on.
How To Do Rainbow Writing
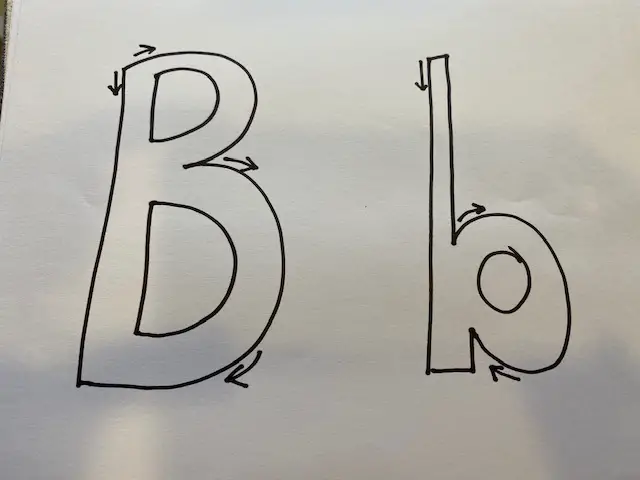
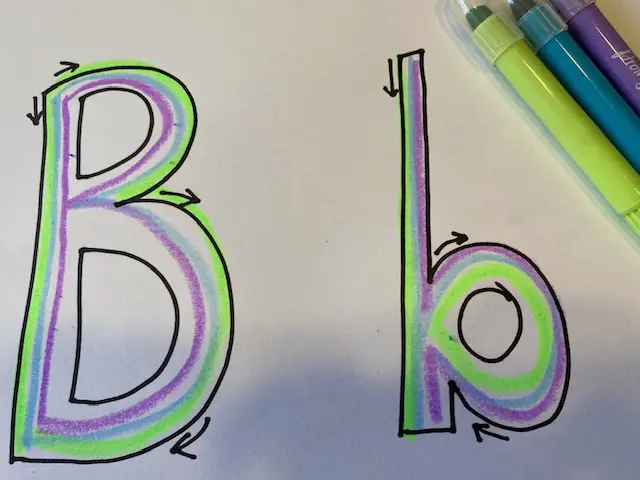
In my samples, I have started with the letter Bb. While I did mine freehand, there is plenty of block lettering that you can find in Word.
The small crayons I used are actually waxy highlighters but good for small hands.
Step 1: Provide the material that is needed
These colorful tools are some I just happen to have at home. Regular crayons, sidewalk chalk, and colored pencils are items you probably have in your classroom.
Step 2. Choose words for the rainbow writing
Rainbow writing is good for many age groups and skill levels but teachers should always take into account the motor skills of the students. The younger the child the more space and bigger tools are needed.
Pre-K and K kids will probably be most successful with letters and numbers. Maybe a child’s name if they are a kindergartener. First-3rd graders work on sight and spelling words but probably not numbers.
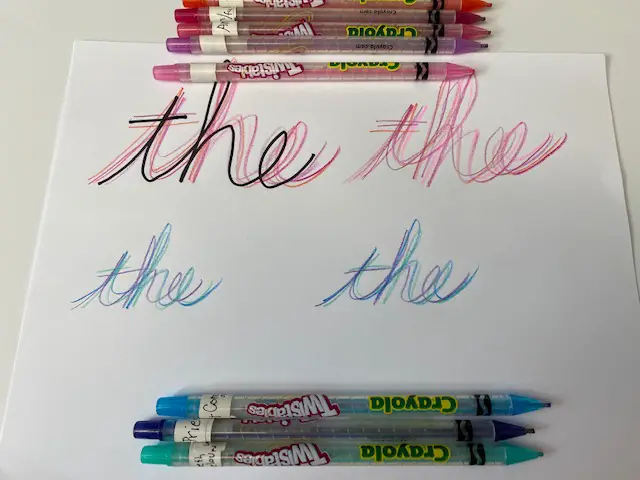
Relevant vocabulary words are perfect for older students. I used the sight word “the” as an example. But you can imagine a page full of pretty words!
Step 3. Write the word lightly in pencil first (so it can be corrected if there is a mistake)
Students may want to make their own pattern by just writing with pencil then going over it with the colors. Remember the younger the child the larger the initial pattern.
Step 4. Use the first color, then continue the color rainbow around the letters.
As I demonstrated in the letter Bb photos, rainbow writing is just a matter of writing the letter over and over. Use different colors and have fun.
Step 5. Final product

Each rainbow project will look unique and because it is practice and kids have some interpretation with colors (thought the letters should be clear).
I advise against grading this lesson. However, while walking around the room, you should help and encourage students where needed.
Kids will want their results to be wonderful but there is a chance that the initial projects won’t appear perfect. Once you’ve introduced the idea to them and do it a few more times, they should get the hang of it and begin to get creative with the coloring.
The final product of rainbow writing can be hung on the wall or included in a book. Sometimes just taking a picture and sending to the home of your students is okay!
Conclusion
Rainbow writing is a great idea. It is an activity that makes repetitive writing practice an art form. It can be done with materials that are on hand in most any classroom.
The activity should match the grade and skill level of the child. While it is very simple to do, the teacher should always teach and demonstrate first.
Rainbow writing can incorporate an art lesson on color with an introduction to the color wheel. Primary colors, analogous and complementary hues are all important for teachers to teach and students to learn.
Practice and have fun at the same time.
